I want to share my take on the Greek peplos because I love it so much, but to call it sewing would be an overstatement. Yes, there is some sewing involved in the construction of this particular one; two seams to be exact, but there doesn’t HAVE to be any sewing involved if you go a different construction route. Some are a long piece of fabric folded lengthwise, with the fold at one side and the overlapped open end at the other side.

There is some confusion between the peplos and another Greek garment, the chiton. The difference is simple. I won’t try to reinvent the wheel by coming up with my own explanation so I’m going to quote The Met’s explanation of each:
The chiton “is constructed in several ways. The most commonly represented is accomplished by stitching two rectangular pieces of fabric together along either side seam, from top to bottom, forming a cylinder with its top edge and hem unstitched. The top edges are then sewn, pinned, or buttoned together at two or more points to form shoulder seams, with reserve openings for the head and arms”
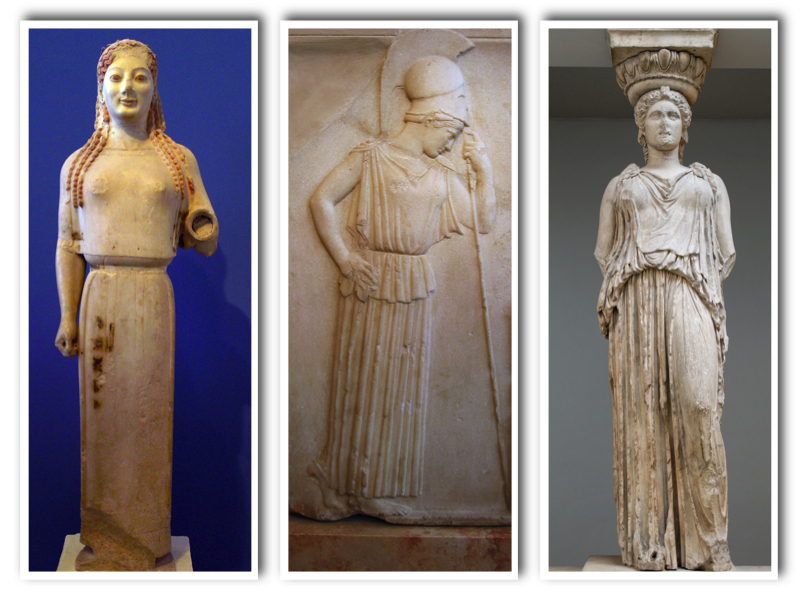
The peplos was “made of one large rectangular piece of cloth, it was formed into a cylinder and then folded along the topline into a deep cuff, creating an apoptygma, or capelet-like overfold. Although there are rare instances of chitons represented with overfolds, a garment is not a peplos unless it has been draped with an apoptygma. The neckline and armholes of the peplos were formed by fibulae, broochlike pins that attached the back to the front of the garment at either shoulder. Of all the identifying characteristics of a peplos, the fastening of its shoulders with fibulae is its single defining detail”
Basically, the chiton does not have a folded top edge, the peplos does have a folded top edge. That explanation from The Met, although not the source I used, explains the general construction of the peplos.
It is such a simple garment but it took a lot of trial and error, from fabric to measurements, to get it to look the way I wanted it to look. I read tutorial after tutorial and they mostly had one single set of measurements, which did not fit me, so I had to experiment. A lot.
I won’t bore you with the details so I’ll go straight into the construction of the final garment.
I used two panels of 44″ wide cotton gauze, which gave my peplos a total circumference of about 82″ after shrinkage from washing. The fabric is very thin, such a wide garment would not work with heavier fabric, at least not for me and not to my liking.
To calculate the total length of the garment, I measured myself from floor to shoulder (52″), then added 25″ for the overhanging fold, plus 2″ (1″ for the bottom hem and 1″ for the top hem). That came to 79″ inches for the length of each panel, and since I needed a panel for the back and a panel for the front, that’s 158″ total length of 44″ fabric. That’s just under 4.4 yards of fabric.
I brought the fabric home and washed it, as usual, which made it shrink, as usual. Then I dyed the fabric because it was white and I wanted blue.
After the fabric was dry, I ironed the selvage area to make it smoother to sew. I folded the entire piece of fabric into two so that so that the two cut edges matched, and cut along the fold. This made the front and the back panels, the width of the fabric by about 2.2 yards. To sew the side seams, I matched the selvages of the front and back panels and sewed up 50″ in each side. This was the height of my shoulders accounting for fold-over length and fabric shrinkage.
Since the fabric shrunk in the wash and I didn’t want to make the peplos shorter, I did not fold the hem under, i just I did a quick zig-zag hem at the top and bottom, just to keep the fabric from raveling. The next step was to fold over the front and the back at the desired point, pin, tie and wear. I should add that for the neckline, the distance between the fibulae in the back is 10″ and 14″ in the front to allow for the drape.
There really is no right way put this together as long as the final result looks how you want it to look. There is also no exact science as far as the measurements; this was just what worked for me. The overhang can be shorter, I just wanted it this length. You may add trim. Because of the way the armholes are made, they are pretty big and show a lot of skin, so unless you want to flash the world, you must wear a bra underneath. If you really want to be period accurate with your undergarments, you can wear a strophium. I chose to tie the peplos at the underbust, as it worked better for me, but it may be tied at different places, as well as over or under the hanging fold. Here are some examples:
Overall, I’m very pleased. I think I will definitely make more peplos to wear to events in Trimaris (Florida) as it’s hot as Hades here (see what I did there?). I’m pretty sure I was the coolest, temperature-wise, person at the event.
florentinescot
LOL! Thanks! I’m a mere 60 miles north of Trimaris up I-75.
phaedra
Thank you fellow Trimarian! I’ll be using your details to make my own peplos for this summer. Linen may be light but a coathardie in Sangre Del Sol (S. Fl) sun is not happening! ☀